介绍
像任何成熟的平台,Android提供了一组UI控制,开发人员可以在其应用程序中使用。 在这篇文章中,我们将了解常见的输入控件,以及如何在Android应用程序中使用它们。
输入控件允许用户提供给应用程序输入块。 这些输入可以是一个文本框,一个按钮的形式,搜索栏,复选框,单选按钮,切换按钮,下拉列表,和选择。
Android有一流的平台对此项支持。 让我们更深入地了解每个控件。
输入控制基础
按钮
这是常规的按钮,其可以被按下。 其由Button类来表示。 A键可以通过文字(i),(ii)或图标,以及(iii)与文本和图标声明。在此有一个XML的简单声明按钮。
<Button
android:layout_width="100dp"
android:layout_height="120dp"
android:text="@string/button_text"
... />
按钮单击事件可以通过点击onclick事件进行注册,具体如下:
android:onClick="Methodname"
文本域
这是一个可编辑的文本字段,并通过EditText表示。
因为有许多是“文本”类型的输入,Android提供了一种通过指定inputType属性来限制输入。常见的inputType属性值是:
文本:表示普通文本(没有限制)
textEmailAddress:表示普通文本加上“@”符号
textUri:表示普通文本加上“/”符号
编号:限制键盘只输入数字
电话:限制输入唯一有效的电话号码字符
textPassword:“*”所有输入
声明举例:
<EditText
android:id="@+id/textPhonenumber"
android:layout_width="fill_parent"
android:layout_height="wrap_content"
android:hint="@string/phone_number"
android:inputType="phone" />
Checkbox
它允许用户选择一个或多个选项。
声明举例:
<CheckBox android:id="@+id/checkbox_adult"
android:layout_width="wrap_content"
android:layout_height="wrap_content"
android:text="@string/adult"/>
RadioButton
用户可从所用列表中只选择一个选项。 它由单选按钮控件表示。单选按钮声明,要求指定包含可用选项类型单选按钮的子项单RadioGroup。
声明举例:
<RadioGroup xmlns:android="http://schemas.
android.com/apk/res/android"
android:layout_width="fill_parent"
android:layout_height="wrap_content"
android:orientation="vertical">
<RadioButton android:id="@+id/radioMale"
android:layout_width="wrap_content"
android:layout_height="wrap_content"
android:text="@string/male"/>
<RadioButton android:id="@+id/radioFemale"
android:layout_width="wrap_content"
android:layout_height="wrap_content"
android:text="@string/female"/>
</RadioGroup>
切换按钮
其通过一个光指示器和由切换按钮控件所表示的一个开/关按钮。这与按钮控件非常相似。
操作
让我们在Android应用程序中创建一个演示使用这些通用的UI控件工作。启动Android工作室,并开始一个新的Android项目。
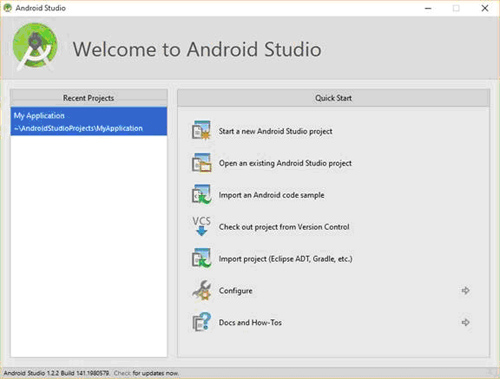
图形1.' 启动Android工作室
提供输入控制演示作为应用程序的名称,然后单击下一步。
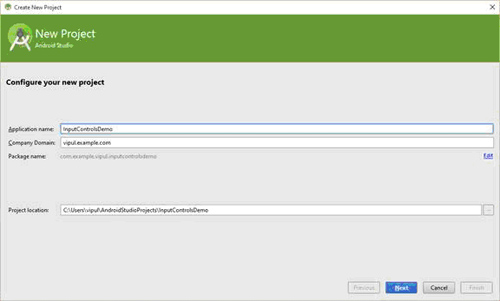
图形2.' 命名的应用程序
在下一个屏幕,保留默认值,然后单击下一步。
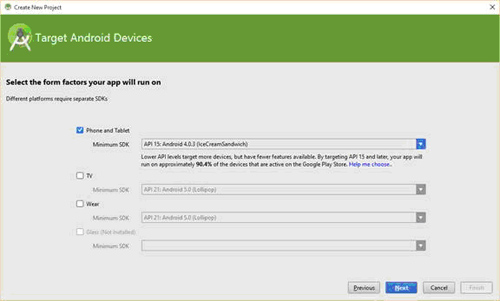
图形3.' 保留默认值到位
添加一个活动至移动摂页面,选择空白活动摂。 这将创建一个活动的应用程序。

图形4.' 添加空白活动
然后,我们激起定制活动。 我们将保留默认值不变。
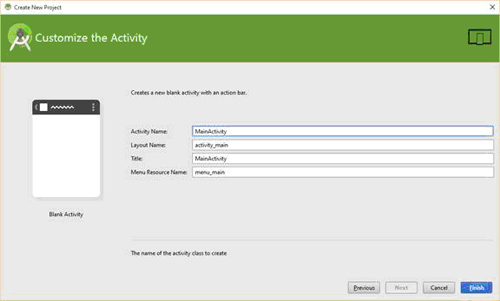
图形5.' 同样,保留默认值到位
点击Finish创建项目文件。
从显示MainActivity的设计来看,我们会添加各种输入控件到用户界面。首先,我们删除的Hello World TextView,并添加控制,如下:
三个TextViews标签: (1)无限制文本,(2)电话输入,以及(3)密码输入
即带有上述TextViews的三个EditText领域
复选框
RadioGroup中有一对单选按钮一为阳性以及另一个为阴性。
按钮
切换按钮
Mainactivity.xml背后的文件代码如下所示:
<RelativeLayout xmlns:android="http://schemas.android.
com/apk/res/android"
xmlns:tools="http://schemas.android.com/tools"
android:layout_width="match_parent"
android:layout_height="match_parent"
android:paddingLeft="@dimen/activity_horizontal_margin"
android:paddingRight="@dimen/activity_horizontal_margin"
android:paddingTop="@dimen/activity_vertical_margin"
android:paddingBottom="@dimen/activity_vertical_margin"
tools:context=".MainActivity">
<TextView
android:layout_width="wrap_content"
android:layout_height="wrap_content"
android:textAppearance="?android:attr/textAppearanceSmall"
android:text="Unrestricted Text"
android:id="@+id/textView"
android:layout_alignParentTop="true"
android:layout_alignParentLeft="true"
android:layout_alignParentStart="true" />
<EditText
android:layout_width="wrap_content"
android:layout_height="wrap_content"
android:id="@+id/editTextUnrestrictedText"
android:layout_alignParentTop="true"
android:layout_centerHorizontal="true" />
<TextView
android:layout_width="wrap_content"
android:layout_height="wrap_content"
android:textAppearance="?android:attr/textAppearanceSmall"
android:text="Phone input"
android:id="@+id/textView2"
android:layout_below="@+id/editTextUnrestrictedText"
android:layout_alignParentLeft="true"
android:layout_alignParentStart="true" />
<EditText
android:layout_width="wrap_content"
android:layout_height="wrap_content"
android:inputType="phone"
android:ems="10"
android:id="@+id/editTextPhone"
android:layout_below="@+id/editTextUnrestrictedText"
android:layout_alignParentRight="true"
android:layout_alignParentEnd="true"
android:layout_marginRight="60dp"
android:layout_marginEnd="60dp" />
<TextView
android:layout_width="wrap_content"
android:layout_height="wrap_content"
android:textAppearance="?android:attr/textAppearanceSmall"
android:text="Password input"
android:id="@+id/textView3"
android:layout_below="@+id/editTextPhone"
android:layout_alignParentLeft="true"
android:layout_alignParentStart="true"
android:layout_marginTop="35dp" />
<EditText
android:layout_width="wrap_content"
android:layout_height="wrap_content"
android:inputType="textPassword"
android:ems="10"
android:id="@+id/editTextPassword"
android:layout_alignBottom="@+id/textView3"
android:layout_centerHorizontal="true" />
<CheckBox
android:layout_width="wrap_content"
android:layout_height="wrap_content"
android:text="New CheckBox"
android:id="@+id/checkBoxSelect"
android:layout_below="@+id/textView3"
android:layout_toLeftOf="@+id/editTextUnrestrictedText"
android:layout_toStartOf="@+id/editTextUnrestrictedText"
android:layout_marginTop="33dp"
android:onClick="onClick" />
<RadioGroup
android:id="@+id/radiogroup"
android:layout_width="fill_parent"
android:layout_height="wrap_content"
android:orientation="vertical"
android:layout_below="@+id/checkBoxSelect">
<RadioButton
android:layout_width="wrap_content"
android:layout_height="wrap_content"
android:text="Male"
android:id="@+id/radioButtonMale"
android:layout_centerVertical="true"
android:layout_alignParentLeft="true"
android:layout_alignParentStart="true"
android:onClick="onClick" />
<RadioButton
android:layout_width="wrap_content"
android:layout_height="wrap_content"
android:text="Female"
android:id="@+id/radioButtonFemale"
android:layout_below="@+id/radioButtonMale"
android:layout_alignRight="@+id/radioButtonMale"
android:layout_alignEnd="@+id/radioButtonMale"
android:onClick="onClick" />
</RadioGroup>
<ToggleButton
android:layout_width="wrap_content"
android:layout_height="wrap_content"
android:text="Click here to toggle"
android:id="@+id/toggleButton"
android:layout_below="@+id/radiogroup"
android:layout_alignRight="@+id/checkBoxSelect"
android:layout_alignEnd="@+id/checkBoxSelect"
android:textOn="Started"
android:textOff="Stopped"
android:layout_marginTop="43dp"
android:onClick="onClick" />
<Button
android:layout_width="wrap_content"
android:layout_height="wrap_content"
android:text="This is a button"
android:id="@+id/button"
android:layout_below="@+id/toggleButton"
android:layout_alignRight="@+id/editTextUnrestrictedText"
android:layout_alignEnd="@+id/editTextUnrestrictedText"
android:onClick="onClick" />
</RelativeLayout>
然后,我们可以更新MainActivity.java类,以为各种输入控件介绍成员变量。
//Mainactivity.java
public class MainActivity extends ActionBarActivity {
ToggleButton toggleButton;
Button button;
EditText editTextUnrestrictedText, editTextPhone,
editTextPassword;
RadioGroup radioGroup;
RadioButton radioButtonMale, radioButtonFemale;
CheckBox checkbox;
@Override
protected void onCreate(Bundle savedInstanceState) {
In the OnCreate method, we initialize these member variables.
@Override
protected voidonCreate(Bundle savedInstanceState) {
super.onCreate(savedInstanceState);
setContentView(R.layout.activity_main);
toggleButton =
(ToggleButton)findViewById(R.id.toggleButton);
button = (Button)findViewById(R.id.button);
editTextUnrestrictedText =
(EditText)findViewById(R.id.editTextUnrestrictedText);
editTextPhone = (EditText)findViewById(R.id.editTextPhone);
editTextPassword = (EditText)findViewById(R.id.editTextPassword);
radioGroup = (RadioGroup)findViewById(R.id.radiogroup);
radioButtonMale = (RadioButton)findViewById(R.id.radioButtonMale);
radioButtonFemale= (RadioButton)findViewById(R.id.radioButtonFemale);
checkbox = (CheckBox)findViewById(R.id.checkBoxSelect);
}
最后,我们执行通用的onClick事件处理方法。
public void onClick(View v) {
if (v.getId() == R.id.toggleButton) {
if(toggleButton.isChecked())
Toast.makeText(getApplicationContext(), "Toggle - Started",
Toast.LENGTH_SHORT).show();
else
Toast.makeText(getApplicationContext(), "Toggle - Stopped",
Toast.LENGTH_SHORT).show();
}
if(v.getId() == R.id.checkBoxSelect) {
if(checkbox.isChecked())
Toast.makeText(getApplicationContext(), "CheckBox - Checked",
Toast.LENGTH_SHORT).show();
else
Toast.makeText(getApplicationContext(), "CheckBox - Unchecked",
Toast.LENGTH_SHORT).show();
}
if(v.getId() == R.id.radioButtonFemale) {
if(radioButtonFemale.isChecked())
Toast.makeText(getApplicationContext(), "RadioButton - Female",
Toast.LENGTH_SHORT).show();
}
if(v.getId() == R.id.radioButtonMale) {
if(radioButtonMale.isChecked())
Toast.makeText(getApplicationContext(), "RadioButton - Male",
Toast.LENGTH_SHORT).show();
}
if(v.getId() == R.id.button) {
Toast.makeText(getApplicationContext(), "Button - Clicked",
Toast.LENGTH_SHORT).show();
}
}
我们的应用程序已完成。 当我们运行应用程序,当我们在各个领域的EditText输入文字时,你会发现输入键盘改变现有的按键。
当各种复选框,单选按钮,切换按钮,和按钮控制的被点击,会有提示信息与对照相互作用的用户。
总结
在这篇文章中,我们学会了如何在Android应用程序使用常见的输入控件。 我希望这篇文章对你有用。
http://www.developer.com/ws/android/programming/working-with-the-android-picker-control-to-select-date-and-time.html